Fitting Instructions

ipad 2 backlight kit fitting instructions

component locations

ipad 2 component locations

the battery and dock connector must not be connected until after the repairs are completed and the lcd and digitiser are reconnected, the ipad must always be powered down before disconnecting the lcd batteryor digitizer

if you are fitting the nw kit you only need to replace the two red components the diode d8228 (this part must be fitted with the marking on the diode as shown) and the emi filter l2200, these components can be replaced with a soldering iron and a needle point tip in order to access these components you will need to remove the protective shield at the left of the lcd connector 

if you are fitting the full kit then you will also need to replace  l8225 (blue arrow)  this should be removed with a   hotair rework gun fitted with a  small nozzle and minimum airflow at a temp of approx 350deg. mask the surrounding components with foil or kapton tape then apply  heat to remove the coil when the solder has flowed the coil can be removed with a pair of tweezers.

if you are using a soldering iron to remove the coil then apply a very small amount of low melt solder in the areas pointed to by the blue arrows use maximum heat on the iron and heat the area of the arrows the low melt solder should gel with the existing solder and allow the coil to be removed be patient this method may take some time dont force the coil as it could damage the pads underneath rendering the pcb useless  when the solder has flowed the coil should come off with no force.

 clean the pads of the pcb and apply a small amount of flux. tin the pads on the new coil with fresh solder and place the new coil on the pcb and apply heat at approx 310deg once the solder has flowed the heat can be removed

ipad mini backlight kit instructions

ipad mini kit fitting instructions

the battery and dock must be disconnected  until after the repair is completed and the lcd and digitizer are reconnected

the ipad must always be powered down before disconnecting the lcd battery or digitizer!!!!

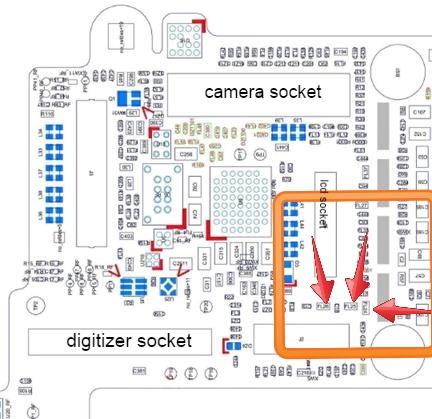
the ipad mini kit includes three components  indicated by the three red arrows the diode(d8228) is the only part that must be installed in the correct orientation indicated by the lines on the diagram and the lines on the actual diode.

the two smaller components d8228 and l2200 can be replaced using a soldering iron with a needle tip the large coil should be removed using a hot air gun and flux, however it can be removed using an iron on full heat and some quick alloy  if you are using a soldering iron to remove the coil then apply a very small amount of low melt solder to the areas indicated by the blue arrows turn the iron to 300deg and heat the area of the arrows the solder should gel with the existing solder and allow the coil to be removed be patient as this method may take some time dont force the coil as it could damage the pads beneath rendering the board useless, when the solder has flowed the coil should come off with no force

many people have problems with l2200 we find this part is best fitted with tweezers between c1753 and c2241 remove the old part carefully / clean the pads so they shine apply a small amount of  flux to the pads using a needle /tin the ends of the filter with fresh solder/position the filter with tweezers as described above/ , heat one end of the filter and allow 5 to 10 seconds to cool then heat the other end. 


iphone4s backlightkit instructions

1/Remove any glue/plastic from the location of the parts using hot air at 200deg and a needle or fine pick

2/Isolate the surrounding parts using kapton tape

3/add flux to the area of the filter and a small amount of low melt alloy / heat the filter using 320 to 350 deg

 low air flow and a small nozzle.

4/When the solder at the base of the filter can be seen to wet or flow  it should be easily removable 

 at the same time remove the diode.

5/Clean and flux the pads /tin the new filter apply the filter and resolder using 300 to 320deg

6/Finally tin the diode and apply using tweezers and again 300 to 320deg the diode should take to the board in seconds

 Remove the heat and test


iphone5s backlight kit instructions

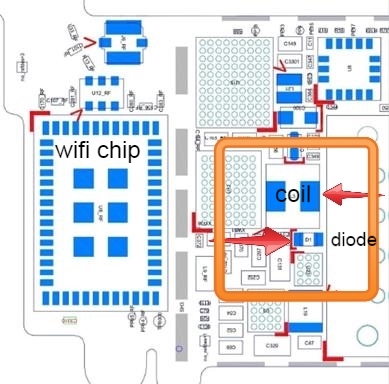
remove the pcb and change the above three filters  when thats done rotate the  circuit board and locate the components below note the correct orientation of the diode (the lower component on the diagram) note that the  cathode or marked end of the diode is indicated by the arrow

with the exception of the coil all of the components should be easy to change with an iron

if you are replacing the coil this should be removed with a   hotair rework gun fitted with a  small nozzle and minimum airflow at a temp of approx 350deg. mask the surrounding components with foil or kapton tape then apply  heat to remove the coil when the solder has flowed the coil can be removed with a pair of tweezers.

if you are using a soldering iron to remove the coil then apply a very small amount of low melt solder in the areas of the two blue pads to the left of the arrow use maximum heat on the iron and heat the area of the arrows the low melt solder should gel with the existing solder and allow the coil to be removed be patient this method may take some time dont force the coil as it could damage the pads underneath rendering the pcb useless  when the solder has flowed the coil should come off with no force.

ipad mini backlight italian version.docx ipad mini backlight italian version.docx
Size : 104.785 Kb
Type : docx
iphone6 backlight instructions.pdf iphone6 backlight instructions.pdf
Size : 271.476 Kb
Type : pdf
ipad3 component locations.pdf ipad3 component locations.pdf
Size : 261.788 Kb
Type : pdf
iphone6 usb ic fitting.pdf iphone6 usb ic fitting.pdf
Size : 591.251 Kb
Type : pdf
bcm5976 and 343s06XX temps (2).docx bcm5976 and 343s06XX temps (2).docx
Size : 31.072 Kb
Type : docx
Ipad Air Backlight Instructions.pub Ipad Air Backlight Instructions.pub
Size : 141.5 Kb
Type : pub
rendash instructions.docx rendash instructions.docx
Size : 686.219 Kb
Type : docx
iphone4s backlight instructions.pdf iphone4s backlight instructions.pdf
Size : 365.295 Kb
Type : pdf
iphone4 backlight kit instructions.docx iphone4 backlight kit instructions.docx
Size : 88.435 Kb
Type : docx
4s wifi ic fitting2.docx 4s wifi ic fitting2.docx
Size : 29.936 Kb
Type : docx
ipad4 backlight kit.pdf ipad4 backlight kit.pdf
Size : 367.698 Kb
Type : pdf
1608a french version.docx 1608a french version.docx
Size : 31.426 Kb
Type : docx
pm8917 fitting.docx pm8917 fitting.docx
Size : 53.441 Kb
Type : docx
pm8917 italian version.docx pm8917 italian version.docx
Size : 29.152 Kb
Type : docx
iphone5 backlight kit guide.pdf iphone5 backlight kit guide.pdf
Size : 587.002 Kb
Type : pdf
343s0694 ic fitting2.docx 343s0694 ic fitting2.docx
Size : 29.734 Kb
Type : docx
hotair soldering small ic's.pdf hotair soldering small ic's.pdf
Size : 99.751 Kb
Type : pdf